iCloud Lock Bypass Guide

What is an iCloud Bypass?
A bypass is the process of removing or mitigating the effects of activation on iOS devices. Depending on the device model and iOS version, an iCloud Bypass can be accomplished either directly by deleting the Setup.app directory from the root filesystem, or indirectly by either modifying existing activation executables or injecting spoofed Activation Records. All modern-day bypass methods are possible because of the extremely powerful and unpatchable checkm8 bootrom exploit that allows us to modify the root filesystem of iOS devices through SSH. The most well known platforms that make use of this exploit include CHECKRA1N, ipwndfu, and checkm8-a5 (arduino).
The goal of direct methods is to create a situation where the device has no Setup and therefore has no choice but to load the SpringBoard, the next highest process after the Setup Assistant (Setup.app). The goal of indirect methods is slightly different- rather than removing Setup.app by deletion, they trick the device into thinking that it has valid activation records. Therefore, even though Setup.app still exists, the device believes that it was activated normally, so it no longer views Activation Lock as a necessary step in the Setup Assistant. Most indirect methods allow you to complete the setup assistant normally after passing the activation screen, since it is nearly impossible to differentiate spoofed activation records from legitimately generated activation records (more on this later).
What causes Activation Lock?
In simplest terms, Activation Lock occurs when an iOS device does not have valid Activation Records and Find My iPhone (FMI) is turned on. There are multiple ways to cause Activation Lock. The first and most common is by restoring or erasing an iOS device that has Find My iPhone turned on (typically with iTunes or 3uTools). Activation Records are Setup.app repellents, they are what prevent the Setup screen from appearing (so long as they exist), and when you restore an iOS device without retaining user data, everything is erased, including Activation Records. Without Activation Records, iOS will by default load the Setup Assistant (Setup.app).
Activation Records are required to a) pass the setup screen legitimately and b) be able to use the most important parts of your iOS device (cellular data, calls, notifications, FaceTime, iMessage, Siri, iCloud, etc). As it turns out, the ONLY way to get activation records is from Apple (yes that’s right, Apple controls your ability to use YOUR device). After a restore, all iOS devices attempt to make themselves useable by connecting to Albert, (the name of Apples activation server- the ultimate dictator of every iPhone, iPad, and iPod Touch on the planet). Albert then gets to decide whether he wants you to be able to use your device or not. His decision is based entirely on a single fact- whether or not Find My iPhone is turned on. Using the Unique Identifiers of your device, he makes his choice. If FMI is on, he says YOU SHALL NOT PASS and throws an HTML page we all know as Activation Lock. If FMI is off, he says We can be friends, have a nice day, and hands your a cryptic golden ticket saying.
a) Tells Setup.app to finish up and get lost.
b) Tells all the essential functions of your device (including the Phone itself) they can start working.
Which brings me to the second most common cause of Activation Lock: remote activation of Lost Mode or Remote Erase. When anyone uses their Apple ID to log into an iOS device, which the Setup Assistant (Setup.app) tells you to do, Apple will make sure that Find My iPhone is enabled on that device by default. This allows the owner of that Apple ID to log into iCloud.com (or the Find My app on another iOS device) anytime they want and remotely make the device that has FMI turned on obsolete by telling it to either enter Lost Mode or erase all its data (the difference between lost mode and remote erase is that lost mode keeps your data while remote erase obviously does not. Lost mode also allows you to set a custom message). However, the main purpose of both methods is simple and straightforward; to get rid of the devices activation records and make the device obsolete, so it must see Albert again. When either method is executed, because there are no Activation Records AND Find My iPhone is turned on, it is the perfect situation for Activation Lock. Albert will say YOU SHALL NOT PASS and throw you an Activation Lock page. Of course, anyone can force Albert to change his mind by entering the correct Apple ID and password, but this situation rarely occurs for many reasons, which I explain in the next section.
The third, most rare, and most strange cause of Activation Lock is nothing. Thats right, Activation Lock can occur completely randomly for no specific reason. If you have owned an iOS device for long enough, you probably had the experience of waking up one morning and finding your device on the Setup Assistant. Or you were browsing in Safari and all of the sudden you saw the apple logo and the Hello screen. You then slid to unlock or pressed home to open and immediately found the Activation Lock screen. If you had entered your Apple ID and Password, the page might freeze for 10 seconds or so and then immediately crash to the Home Screen, with no Data and Privacy, no Touch ID setup, no Welcome to iPhone get started, nothing. However, if you did not remember your Apple ID (lets say you set it up when you bought the device and its been 5 years and you never used it since, I dont blame you) then you are locked out, for absolutely no reason at all. This happened to someone I knew very well- they lived overseas in a small country and it took me nearly 5 months to ship them an iPhone. They were so excited to have the device and set it up with their own Apple ID, but a few days later it randomly crashed and showed Activation Lock. Unfortunately they did not know their password, and they did not have a computer to use for bypassing, so in one split second everything they knew and loved about their iPhone was gone forever. I use an iPhone 6s and this strange phenomena has happened multiple times on my personal device, even in a jailbroken state. However, the strange thing about this type of Activation Lock is that it can actually save your activation records. So if you do manage to delete Setup.app, sometimes you can still continue to use your device like normal, which is the weirdest part. For example, some people have deleted Setup.app on an iPhone 4s using my arduino method and they got calls and data (who knew!). Their device was most likely once affected by this rare occurrence of Activation Lock, and was never Restored, Remote Erased, or put into Lost Mode.
Why Bypass Activation Lock?

You might think that people who bypass activation lock are iPhone thieves or criminals, but this is rarely true. Think back to Find My iPhone. As I mentioned in the last section, Apple makes sure that all new iPhone users have Find My iPhone enabled by default. However, I can assure you that many people would rather have it turned off if they were reading this post. Human memory is far from perfect, and oftentimes passwords can be tricky to remember, especially among older generations. I have met many people over the years who have come to me with Activation Lock who had absolutely no idea what it was, why it existed, or how Find My iPhone was turned on in the first place. An Apple store employee probably helped them create an Apple ID when they purchased their device, and they simply never used it since. How would you expect someone in this situation to remember their Apple ID, let alone know their password?
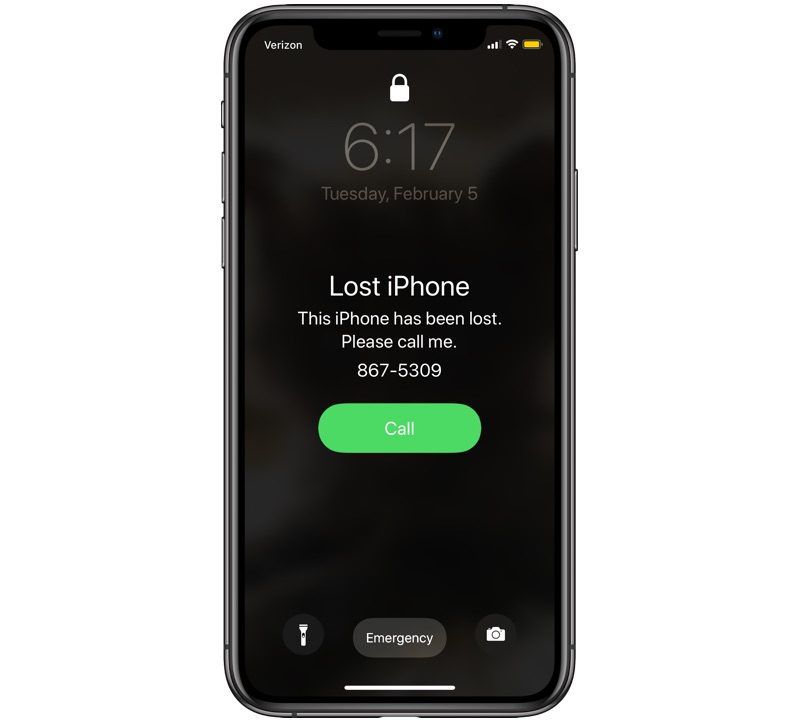
There is also Lost Mode. People who use Lost Mode most likely lost or misplaced their iPhone, iPad, or iPod Touch, and for obvious reasons they do not want anyone else using their phone. Makes sense, I wouldn’t either. But consider this. If you lost an iOS device, you are not going to simply live without a phone or a tablet. In our highly technological modern world, digital technology has evolved into a necessity for work, communication, recreation, and much more. So that person who lost their phone on the beach one summer is not going to wait until its found to move on with their life, they will most likely take a trip to the local Apple store or cell service provider and buy a new device to use as their daily driver. Maybe a year passes, or even 5 years, and by then they have several new phones and totally forgot about the device they lost ages ago. Then one day someone creative enters the scene, discovers the lost treasure, and finds that it miraculously accepts charge and comes back to life. They notice there is a message from the old owner on the screen with a phone number, so they call that number, but of course the owner has no idea who they are and immediately hangs up the phone (I have found multiple phones in lost mode with valid phone numbers, and this is usually what happens). So, there you have it. A perfectly good iPhone that the original owner does not want or need, and the new discoverer is stuck with Activation Lock. Who wouldn’t want to bypass in this situation? That’s all assuming Lost Mode actually does its job and displays the owners message. If the device is a WiFi only iPad or iPod Touch, then Lost Mode is completely useless, because unless the device moves into close proximity of a known WiFi network, it will never show the owners message.

And of course the biggest reason of all why so many people bypass is because of unfortunate or uninformed sales! Thieves who steal iOS devices want to get rid of them quick, and make some fast cash. The most common way this is done is through Craigslist or eBay. Thieves will do a quick restore to get the device on the setup screen, then sell it to some uninformed buyer who doesnt know any better and thinks its a brand new device. The victim of the scam sets it up, and of course they are stuck with Activation Lock, but its not their fault at all, its the thiefs fault, and unfortunately iDevice thieves are rarely caught. Apple could have been really smart about this and chosen to display the FULL email address of the owners account to whom the device is linked, but instead they only show the first letter! What good does that do? If the victim of the scam had a way to reach out to the victim of the robbery, then they could settle and make the device useable again, but Apple would rather sacrifice the usability of iOS devices than display full emails on the setup screen. Not a good choice. Luckily for the victim, since there is no way to reach out to the original owner, they get to have some fun with bypassing. And when it comes down to it, in this situation its not the fault of the user for trying to make a device useable that they paid for, its the fault of Apple for making it nearly impossible for victims of scams to return their devices to the original owners. No matter what, the device will be obsolete unless the user chooses to bring it back to life with a bypass. My philosophy is to always to bring iOS devices back to life whenever possible so that someone, rather than no one, will benefit!
How does an iCloud Bypass work?
- iOS 13 mobileactivationd Bypass
- Target Devices: iPhone 6s – iPhone X, pre-A11 iPads, iPod Touch 7
- Target Versions: iOS 13.3 – 13.7
- How it Works: The mobileactivationd binary is renamed and replaced with a disassembled/patched copy, for which all instances of un-activated are changed to activated. This tricks the iOS device into thinking it has valid activation records for the purpose of skipping the setup assistant, but in reality none have been applied, so all device features that require activation records to function properly are not useable. All apps that do not require activation records are completely useable, including Safari, Music, Camera, Photos, and much more. However, since the patched binary cannot be codesigned with an Apple signature, this bypass is not persistent after a reboot.
- iOS 12 mobileactivationd Bypass
- Target Devices: iPhone 5s, iPhone 6, iPhone 6 Plus, iPad Mini 2, 3, iPad Air 1, iPod Touch 6
- Target Versions: iOS 12.4.5 – 12.5.1
- How it Works: The mobileactivationd binary is renamed and replaced with a disassembled/patched copy, for which all instances of un-activated are changed to activated. For iOS 12, additional steps are taken to ensure the device accepts the unsigned binary, including UIcache. This tricks the iOS device into thinking it has valid activation records for the purpose of skipping the setup assistant, but in reality none have been applied, so all device features that require activation records to function properly are not useable. All apps that do not require activation records are completely useable, including Safari, Music, Camera, Photos, and much more. However, since the patched binary cannot be codesigned with an authentic Apple signature, this bypass is not persistent after a reboot.
- iOS 12 / iOS 13 Setup.app Removal
- Target Devices: iPhone 5s – iPhone X, pre-A11 iPads, iPod Touch 6, 7.
- Target Versions: iOS 12.0 – 12.4.4, iOS 13.0 – 13.2.3
- How it Works: Setup.app is renamed to Setup.app.bak to remove the presence of the Setup Assistant. Additional steps are taken to ensure that Setup.app is completely unrecognizable, including uicache and restarting the backboardd process. Because the device has no idea that Setup.app exists, this modification is persistent even after a reboot. All apps that do not require activation records are useable, including Safari, Music, Camera, Photos, and much more. Apple identified and patched this method with the release of iOS 13.3, which introduced a new systemwide detection of Setup.app that sends iOS devices into a panicked, frozen state when Setup.app is unrecognizable. As a result, the mobileactivationd bypass was discovered and introduced.
- iOS 12 / 13 / 14 Passcode Bypass
- Target Devices: iPhone 5s – iPhone X, pre-A11 iPads, iPod Touch 6, 7.
- Target Versions: iOS 12.0 – 12.5.1, iOS 13.x.x, iOS 14.0 – 14.2
- How it Works: Passcode locked or disabled devices almost always have a valid set of factory activation records (unless they were bypassed previously). When a passcode bypass is performed, those records are extracted and saved to a folder on the Desktop specifically.
- activation_record.plist,
- data_ark.plist,
- com.apple.commcenter.device_specific_nobackup.plist,
- IC-Info.sisv .
- A system binary is then inserted into the /bin directory in the root filesystem and given an argument that instructs the device to force erase itself regardless of whether FMI (Find My iPhone) is turned on or turned off.
After the erase has completed, all user data including the passcode is gone, but the device needs a valid set of activation records to pass the setup assistant (Setup.app) and activate Phone, Messages, FaceTime, iCloud, etc. Normally Albert (Apples activation server) would provide these records, but because Find My iPhone is turned on, Albert refuses to generate a new activation_record.plist and instead shows the Activation Lock page. However, this is not a problem, because all of the activation records that we saved to the Desktop can be re-applied into the filesystem. Before the activation records are installed, they are uploaded to the user Media (Downloads) folder and permissions/flags are changed so that the device will be able to read and accept them when they are moved to their correct locations. A good passcode bypass will set permissions/flags such that all activation records are signed and persistent after a reboot, and unchanged by setting a passcode.
- iOS 12 / 13 / 14 GSM Signal Bypass
- Target Devices: iPhone 7 – iPhone X (GSM only)
- Target Versions: iOS 13.x.x, iOS 14.x.x
- How it Works: By now you probably understand that Albert will refuse to generate activation records for devices that have Find My iPhone turned on. That part is pretty straightforward. But consider this- activation records are also specific to the unique identifiers of every iOS device (such as Serial Number, IMEI, UDID, ECID, etc). In other words, if activation records are created for the specific unique identifiers of a device, that device will accept them and become fully functional. This is the general idea that hackers used to come up with an extremely clever method to fetch activation records directly from Albert for any target iOS device. While in reality the GSM Signal Bypass is a very sophisticated and complicated method, the overall concept is fairly simple and understandable. It all starts with another iOS device. To start, another iPhone that has Find My iPhone turned OFF is jailbroken so that its root filesystem can be modified. Next, the unique identifiers of the Activation Locked device that has Find My iPhone turned ON (Serial Number, IMEI, UDID, etc) are fetched and assigned to the second iOS device that has Find My iPhone turned OFF. In other words, the unique identifiers of the device with Find My iPhone OFF were temporarily covered up replaced with the unique identifiers of the device with Find My iPhone ON. Now, here is the best part. Albert (albert.apple.com, Apples activation server) does not notice or care that the second device with Find My iPhone OFF has a changed set of unique identifiers. Under normal circumstances Albert might notice, but an SSL process that occurs during activation is modified (people also call this hooking or pinning) to ensure that Albert is completely oblivious to the fact that the IMEI, Serial Number, UDID, etc came from an Activation Locked device that has Find My iPhone turned ON. Right, now we are in an absolutely perfect situation. What happens next is an activation request (AKA the process that happens when it says It may take a few minutes to activate your iPhone) is started from the device with Find My iPhone OFF. Since Albert has no clue whatsoever that the unique identifiers are different, it generates a perfectly valid set of activation records based on the unique identifiers it sees, which are of course the unique identifiers of the Activation Locked device with Find My iPhone ON. At this point, the freshly generated activation records are taken from the device with Find My iPhone OFF and the most important piece (the WildCard ticket) is applied to the filesystem of the Activation Locked Device with Find My iPhone ON in the form of activation_record.plist (just like the Passcode Bypass). Because the activation_record.plist was created for the unique identifiers of the Activation Locked device by Albert (the only process that is capable of creating activation records), everything is perfect, and the device is able to accept the activation records (also known as a baseband ticket) in the same way it would have accepted them if normal activation had occurred (which basically did). The reason Apple has not patched this method is because to implement a process in Albert that checks the authenticity of the unique identifiers of every device that gets activated would require a complete server rework and cost an extreme amount of money. Apple has chosen not to dedicate their resources to performing such a task. Unless they change their mind, the GSM Signal Bypass will likely exist forever for checkra1n-compatible iOS devices. However, the majority of iOS devices nowadays have an MEID, which is like an extra layer of security that prevents the device from being able to accept non-authentically generated activation records. This just adds an extra step though, and hackers have already found a way to hash/sign the records to bypass it, so we may see a method for MEID devices fairly soon. If one does surface, Apple will once again likely choose not to patch it.
- A4, A5, A6, A7 Setup.app Removal via SSH Ramdisk
- Target Devices: iPhone 4, 4s, 5, 5c, 5s, iPod Touch 5, iPad Air 1, iPad Mini 1, 2, iPad 2, 3, 4.
- Target Versions: iOS 10.3.3 (A7), iOS 10.3.3/10.3.4 (A6), iOS 9.3.5/9.3.6 (A5), iOS 7.1.2 (A4).
- How it Works: When you restore an iOS device to the latest version of iOS normally (with iTunes or 3uTools), a series of small image files are uploaded and executed before the restore actually begins. The purpose of this process is to prepare the device for a full filesystem rewrite. These files include iBSS, iBEC, DeviceTree, Ramdisk, and Kernelcache. For a normal restore, the device would actually receive a newly-written filesystem after all these files are uploaded, which is important to understand, because all ramdisk iCloud Bypass methods work by starting a restore but not actually restoring the device or writing any contents.
The first and most important step in any ramdisk iCloud Bypass method is PWNED DFU MODE with the checkm8 exploit. What PWNED DFU allows us to do upload whatever image files we want. The regular image files for the latest version of iOS might upload properly without PWNED DFU, but that wont help us at all. We need to upload special patched versions of everything: patched iBSS to allow patched iBEC to load, patched iBEC to give the device custom boot arguments (including -v for verbose boot), and most importantly, a patched ramdisk that instructs the device to open up an SSH connection when all the pre-restore steps are complete. An exploit like checkm8 is required to upload and execute patched and unsigned images.
Sliver has all of the necessary patched files for every device pre-bundled and loads them automatically when you click Load Ramdisk. After the last file (Kernelcache) is uploaded, the bootx command is executed, which starts the SSH connection and allows any client to SSH into the device (popular ones are TCPRelay, iproxy, Cyberduck) and view the root filesystem. Sliver uses TCPRelay when you click Relay Device Info. For A7 devices, a custom payload is then executed that instructs the device to delete Setup.app and reboot itself, so no ramdisk image is necessary, but for all A6 and A5 devices, the SSH connection is opened first through the ramdisk and then a script is executed that automatically logs into root@localhost and runs the ssh commands to mount the filesystem, delete Setup.app, and reboot. For A5 devices, when Setup.app is missing the device will simply boot straight to the home screen. For A6 and A7 devices however, the device must have been restored and put into DFU mode immediately prior to the bypass or else the black screen issue will occur.
The reason for the black screen issue is when the device has not completed the post-restore progress bar, which essentially resets the filesystem. When Setup.app is deleted and the post-restore progress bar occurs afterwards, the device understands that Setup.app never is and never was a part of the filesystem, so it can ignore it. But if the post-restore progress bar has already completed with Setup.app and then Setup.app is deleted afterwards, the filesystem will think it is missing something and refuse to boot to the home screen. This is why I always tell people to restore and enter DFU before the on-device progress bar when attempting any ramdisk method, just to be safe.
If you want even more detail and tutorial with step by step guides on how to these fun bypass methods on your devices then please enroll in the Phonlab Smartphone Tech course today.